Translate this page into:
Step by step carving of maxillary central incisor


*Corresponding author: Rim Kallala, Department of Dental Anatomy, Faculty of Dental Medicine, University of Monastir, Monastir, Tunisia. rim.kallala@fmdm.u-monastir.tn
-
Received: ,
Accepted: ,
How to cite this article: Touzi S, Kallala R, Moalla H, Hadj Khalifa AB. Step by step carving of maxillary central incisor. J Academy Dent Educ. 2025;11:10-4. doi: 10.25259/JADE_57_2024
Abstract
Objectives
The purpose of this paper is to detail the steps for carving the maxillary central incisor, providing guidance for dental students to successfully carve this tooth
Material and Methods
During the first year, dental anatomy is one of the core subjects taught to dental students in the faculty of dental of medicine Monastir Tunisia. In the curriculum of first year dental study, it is the unique dental speciality. First, it is taught through lecture sessions in where the student acquires the knowledge about the teeth: from general characteristics to specifics ones. The terminology and different dental tissues are also taught. Second, during the lab sessions, students are invited to carve the teeth in order to anchor the knowledge of dental anatomy and to acquire manual skills.
Results
The tooth is correctly carved with a respected outlines and surfaces.
Conclusion
The carving to the teeth is a mandatory step to each future dentist which plays a crucial role to anchor the Knowledge dental morphology.
Keywords
Carving
Dental anatomy
Education
Morphology

INTRODUCTION
Dental anatomy is a specialized field in anatomy that concerns the study of the tooth as an isolated entity.[1] During the 1st year, it is one of the core subjects taught to dental students in the faculty of dental medicine in Monastir, Tunisia. In the curriculum of 1st year dental study, it is the unique dental specialty. First, it is taught through lecture sessions in where the student acquires the knowledge about the teeth: From general characteristics to specific ones. The terminology and different dental tissues are also taught. Second, during the lab sessions, students are invited to carve the teeth to anchor their knowledge of dental anatomy and to acquire manual skills.
The purpose of this paper is to detail the steps for carving the maxillary central incisor, providing guidance for dental students to successfully carve this tooth.
MATERIAL AND METHODS
Material
At the faculty of dental medicine Tunisia, the carving is performed on soap or plaster blocks, which are previously adjusted to the widths and lengths of the concerned tooth. A plaster knife, a Zahl spatula and pens are also used.
Method
Drawing step
The drawing step is crucial for the carving procedure. The student is asked to draw the buccal and the mesial face of the tooth respecting the given dimensions at Scale 3 [Table 1]. The shape respect is necessary [Figures 1 and 2].[2]
| Total length (mm) | Crown length (mm) | Root length (mm) | Greatest mesiodistal distance (mm) | Cervical mesiodistal distance (mm) | Greatest buccolingual distance (mm) | Cervical buccolingual distance (mm) |
|---|---|---|---|---|---|---|
| 2.3 | 1.1 | 1.2 | 0.9 | 2.3+0.6 |

- The drawing of the buccal view of the 11. (1): Distal contact zone, (2): Mesial l contact zone, (3): Greatest mesiodistal distance, (4): Mesial cervical point, (5): Distal cervical point, (6): Cervical mesiodistal distance, (7): Apex.: Cervical convergence (red arrows)

- The drawing of the mesial view of the 11. (1): Buccal height of curvature, (2): Lingual height of curvature, (3): Greatest buccolingual distance, (4): Buccal cervical point, (5): Lingual cervical point, (6): Cervical buccolingual distance, (7): Apex.: Undercut zone (red arrows), Clearance zone (blue arrow)
Two major steps are followed to carve the central incisor: the cutting and the rounding.
The cutting step
It aims to respect the shapes and outlines of the tooth. It is divided into two steps, the first and the second cutting.
First cutting
It consists of the cutting of both buccal and lingual faces. Once the drawing of the buccal view is validated, it is cut twice. Then, sticked on the prepared block [Figure 3]. Projections are made and the cutting is performed [Figure 4].

- The buccal drawings are sticked on the prepared blocks.

- The obtained result after the first cutting.
It aims to respect the greatest mesiodistal diameter, cervical mesiodistal diameter, the cervical convergence, and the situation of the contact zones on the incisivo cervical direction.
It consists of the cutting of both mesial and distal faces. Once the drawing of the mesial view is validated, it is cut twice. Then, sticked on the mesial and distal [Figure 5]. Projections are made and the cutting is performed [Figure 6].

- The result after the second cutting.
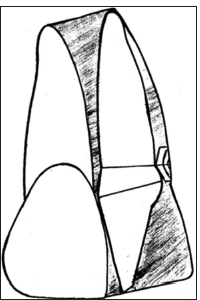
- The Mesial drawing is sticked on the mesial side of the first cutting.
It aims to respect the greatest buccolingual diameter, cervical buccolingual diameter, the situation of both height of curvature in the incisive-cervical direction. Both the undercut and the clearance zones are respected at this step.
The rounding step
It aims to eliminate angles and respect the convexity of surfaces.
The first step consists of the carving of a continuous cervical line that circumvents the tooth. The rounding step contains the rounding of the tooth (crown and root) and the rounding of the cingulum of the lingual view.
The contact zones, cervical points, and the heights of curvatures are reference points which should be respected to respect the tooth dimensions.
RESULTS
The result of the carving of this maxillary central incisor would be a physical replica of the tooth, meticulously shaped according to the techniques and measurements outlined in the paper. The customized figures would visually demonstrate how the initially blank material was transformed, step by step, into a form that accurately represents the anatomy of a maxillary central incisor, including its characteristic crown shape, surface contours (labial convexity, lingual fossa, cingulum, marginal ridges), and the form of the root. The carved tooth is finished. The outlines and surfaces are respected [Figure 7].

- (a) Buccal view (black arrow), (b) Lingual view (dashed lines).
DISCUSSION
The knowledge of the tooth’s features is essential to each future dentist.[3] The learning support is generally based on images and drawing with texts to make the comprehension and the understanding easier.[3] Understanding dental anatomy is crucial in clinical practice across several fields.[2,4] In oral radiology, it aids in diagnosing various anomalies visible radiographically by enabling differentiation between normal and abnormal tooth variations. In oral surgery, knowledge of tooth root depth ensures complete extraction without leaving root pieces or other abnormalities. Prosthodontics benefits from an understanding of tooth contours, overjet, and overbite, which are essential for smile design and the fabrication of fixed and removable prostheses. In conservative dentistry and endodontics, carving in tooth fillings restores normal anatomic structure and function, with proper amalgam restorations lasting up to 30 years. Root morphology knowledge is vital in endodontics. In periodontology, effective plaque and calculus removal require well-developed manual dexterity, particularly in hand scaling. Forensic odontology relies on tooth morphology to aid in identifying deceased individuals, highlighting the importance of understanding living tooth morphology. Finally, in community dentistry, distinguishing between non-diseased and diseased teeth is crucial for epidemiological surveys.[2,4]
The teeth carving are as well, mandatory to develop appropriate motor skills. This practical aspect would certainly help to anchor the knowledge about the teeth features and characteristics.
Traditional dental education, particularly in tooth morphology, has long depended on media such as wax, chalk, or soap for carving tooth models. This method, extensively documented,[1,2] is a foundational pedagogical tool that helps students deeply understand complex dental morphology. Engaging in tooth carving exercises enhances fine motor skills and solidifies the theoretical knowledge needed for reconstructing tooth structures in restorative procedures.[2,3] A notable study by Abu Eid et al. demonstrated that these practical sessions significantly improved 1st-year dental students’ manual dexterity and their ability to visualize the three-dimensional architecture of teeth.[2]
Building on this foundation, traditional carving exercises have been complemented by clinical-based teaching and digital learning platforms.[4] This hybrid approach aims to boost student engagement and knowledge retention by linking tooth anatomy to clinical relevance and familiarizing students with modern digital tools used in dental practice. The COVID-19 pandemic accelerated the adoption of innovative educational methods, including at-home waxing exercises and the use of 3D tooth models.[3,4] These adaptations proved effective for delivering essential content remotely. However, students have shown a strong preference for returning to on-site, interactive learning environments for tooth morphology modules, highlighting the enduring value of traditional, hands-on education.
To make dental anatomy classes and wax block carving a better experience for students, online platforms, interactive simulations, and virtual labs (carving teeth virtually) as suggested by Lim et al.[5] can provide students with additional opportunities to explore and expand their background knowledge. Lim et al.[5] used a 3D modeling technique following the tooth carving stages. Lim et al.[5] also used mobile educational tool based on augmented reality technology to provide a guide for students to follow by giving the learner the possibility to observe the carving steps in three dimensions by pressing the next step and previous step buttons.
CONCLUSION
Through tooth carving, students gain a thorough understanding of tooth morphology while simultaneously developing psychomotor skills. This hands-on practice aids in tooth identification, recognition and diagnosis of anomalies, and understanding disease progression. It also supports informed decision-making in treatment planning based on the severity of each case.
Ethical approval
The Institutional Review Board approval is not required as the paper meticulously details a tooth carving manipulation with custom figures.
Declaration of patient consent
Patient’s consent not required as there are no patients in this study.
Conflicts of interest
There are no conflicts of interest.
Use of artificial intelligence (AI)-assisted technology for manuscript preparation
The authors confirm that there was no use of artificial intelligence (AI)-assisted technology for assisting in the writing or editing of the manuscript and no images were manipulated using AI.
Financial support and sponsorship: Nil.
References
- Perception of dental anatomy among dental students, dental practitioners, and dental academicians: A questionnaire-based cross-sectional study. J Acad Dent Educ. 2022;8:9-14.
- [CrossRef] [Google Scholar]
- Self-directed study and carving tooth models for learning tooth morphology: Perceptions of students at the University of Aberdeen, Scotland. J Dent Educ. 2013;77:1147-53.
- [CrossRef] [PubMed] [Google Scholar]
- Different methods of teaching and learning dental morphology. Dent J (Basel). 2024;12:114.
- [CrossRef] [PubMed] [Google Scholar]
- Anatomical sciences: A foundation for a solid learning experience in dental technology and dental prosthetics. Anat Sci Educ. 2017;10:395-404.
- [CrossRef] [PubMed] [Google Scholar]
- Mobile educational tool based on augmented reality technology for tooth carving: Results of a prospective cohort study. BMC Med Educ. 2023;23:462.
- [CrossRef] [PubMed] [Google Scholar]